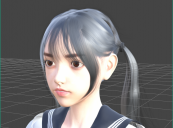
The exported model’s hair has too many polygons when using it in Unity.
I exported a character from Daz Studio to use in Unity after applying a hairstyle.
However, when I checked it in the Unity Editor, the hair looked noisy or grainy, as shown in the second image.
After checking further, it seems the hair alone exceeds 40,000 polygons.
How can I reduce the polygon count while keeping the hair’s appearance similar to how it looks in Daz Studio (as in the first image)?
Here is the model I’m using:
https://www.daz3d.com/shizuka-hd-character-and-hair-for-genesis-8-female


スクリーンショット 2025-10-23 011623.png
860 x 636 - 446K


スクリーンショット 2025-10-23 011722.png
1019 x 572 - 358K


Comments
Invest in PolyFew on the UAS. It's the best LOD creator. Add Magica Cloth 2 for moving hair.
Sorry reread your post.. regarding the second image, remember there is no anti-aliasing in the scene viewport so that'll look like how it does. To get scene view AA you need to use HDRP. The actual gameview will look fine.
Thank you for your reply.
I had already considered using LOD, and before introducing assets, I first tried using Unity 6's LOD generation function.
However, because each strand of hair is made into a tube-shaped model, I couldn't reduce the number of polygons as I wanted, and trying to reduce them further would distort the shape of the hair.
Ideally, I would like to generate a model for each hair clump rather than generating a model for each strand of hair, or to attach a hair texture to the mesh.
I'm aiming for a maximum of 4000 polygons for the hair. I think I can reduce it even further if I use only a mesh and texture.
Can this be achieved in Daz Studio?
Yes, you can reduce number of polygons in Daz Studio. See below.
1. Check if you have Decimator:
* It’s a paid add-on for Daz Studio.
https://www.daz3d.com/decimator-for-daz-studio
* If installed, go to Window → Panes (Tabs) → Decimator.
2. Load the Hair:
* Select the hair object in the **Scene** tab.
3. Apply Decimation:
* In Decimator, set the target polygon count (e.g., 4000).
* Preview the result before applying.
4. Export:
* Save as OBJ or FBX for use in other software.
You could use Daz to Unity bridge, as well.
https://www.daz3d.com/daz-to-unity-bridge
In Unity:
1. Texture Workflow
* Use **baked textures** (Diffuse, Normal, Alpha).
* Save in **PNG or TGA** for transparency.
* In Unity:
* Create a **Material → Shader: HDRP/Lit** or **URP/Lit** (depending on pipeline).
* Assign **Base Map** (Diffuse), **Normal Map**, and **Opacity**.
* Enable **Alpha Clipping** for transparency.
2. Hair Transparency
* Hair usually uses **Alpha Cutout** or **Alpha Blend**:
* In Material settings:
* **Surface Type**: Transparent
* **Alpha Clipping**: ON (for sharp edges)
* Adjust **Threshold** for best look.
3. Performance Tips
* **Mipmaps**: Enable for textures.
* **Compression**: Use ASTC or DXT for mobile/desktop.
* **LOD Groups**:
* Create LODs for hair (e.g., 4k → 2k → 500 polys).
* **GPU Instancing**: Enable if multiple characters use same hair.
4. Lighting & Shadows
* Hair can look flat if shadows are wrong:
* Enable **Cast Shadows** in Mesh Renderer.
* Use **Double-Sided Rendering** in shader for hair strands.
5. Physics (Optional)
* For movement:
* Use **Unity Hair Physics** or **Dynamic Bone** (paid asset).
* Or simulate with **Cloth Component** for simple sway.
If you do not have Decimator for Daz Studio, you could export hair and reduce in Blender.
1. Export Hair from Daz:
* File → Export → OBJ (or FBX).
* Make sure to export only the hair.
2. Import into Blender:
* Use **File → Import → OBJ/FBX**.
3. Use Decimate Modifier:
* Select the hair mesh.
* Add **Modifier → Decimate**.
* Set **Ratio** so that final poly count ≈ 4000.
* Apply modifier.
4. Optional Retopology:
* For better quality, use **Quad Remesher** or Blender’s **Remesh** tool.
5. Apply Transformations in Blender:
* `Ctrl+A → Apply All Transforms` (Location, Rotation, Scale).
Use baked textures (Diffuse, Normal, Alpha).
* Save in **PNG or TGA** for transparency.
* Export as FBX:
* Use File → Export → FBX.
* **Settings**:
* Apply Modifiers: ON
* Smoothing: Face
* Scale: 1.0
* Forward: `-Z Forward`, Up: `Y Up` (Unity standard).
I have decimated Shizuka hair in Decimator in Daz Studio to 4000 polygons.
It does not look good in Unity 6000.2.6 URP (on the right)
Shizuka hair reduced to about 4000 polygons in Blender.
Still needs more work to be usable in Unity.